Minty Mongo condiment…aam pudina ki chutney

mango mint condiment

Heat is at pinnacle now. As I promised in my last post – Aam Pana, that I will be using more of mangoes this season and will try to make the good-ol’ mumma’s recipes and relive my childhood, here I share the chutney which is very much a sweetheart  in summers in north India.

The mingling of raw mangoes and mint creates a very soothing tangy magic, a subtle hint of garlic and spice as you want them, is just cannot be missed in the summers.

 Minty Mango Chutney

Time: 10 mins

Serves: 1 cup chutney

Ingredients:

  • 2 raw mangoes, green variety (kairi), stoned and cut in to cubes
  • 1/2 cup mint leaves
  • 2-3 garlic pods (ahh!! I can’t get enough of them)
  • 1/2 tsp. roasted jeera
  • 2 green chilies (love the Concoction of chilies with tang)
  • 1 tsp. common salt or per you taste
  • a pinch of black salt

Preparation:

  • Blend all the ingredients and chill.
  • Relish with your meals or even as a sandwich spread.

Pudina aur kacche aam ki chutney

Notes:

Mint is a cooler and relives any stomach pain or disorder.

The mingling of mint and mango is a sure rescuer for the sweaty days.

You can use some tempering on the chutney, but this tastes awesome just plain too.

A fizzy welcome to Summer with Aam Panna

My fizzy Aam Panna

Now that the summer is throwing scorching heat and temperature is soaring high day by day in pune, it is time to soothe the sweat with some thirst quenchers. Time is on to relish chilled lassis, icy chhach/mattha (buttermilk), juices and shakes. But one heat soother I remember from my childhood is Aam Panna. Very tangy, very tasty and tantalizing for the tongue, healthy and low-cal thirst quencher.

All we need to do is boil the raw mango until the skin ruptures, smash off the pulp, remove skin, sieve the extract and relish in salty or sweet form. That is it!! And for those of you, who want to make syrup of it, can store it for longer time and can make a drink of the syrup by simply adding chilled ice loaded water with some spoon of the syrup. I believe, that has to be sweeter. Perhaps, you need to prepare sugar syrup, add cooled down pulp and jeera(cumin) powder to it. It can be bottled and stored in fridge for a month. I have not done it myself and never seen anyone back home doing this, so I don’t have much awareness on this part. I believe, fresh is best for panna.

my fav thirst quencher for this summer

I still have not-so-faded glimpses of my summers during the early years of life, my mom used to prepare panna in both salty n sugary flavor as we, kiddos, loved sweet panna and my father used to take it in salty way. He used to come home for lunch in the peak burning hours of noons and used to drink panna with some finely chopped onions in it to cool down the temperature, my papa’s way to doing things his style J. That “chilled glass of something” used to be a part of our lunch without fails.

I started preparing after my marriage with the faint memories of what I used to do under my mom’s supervision. Now, I plan to do lot more with kacchi kairi this year like green piquant chutney (ummm..my fav, finger licking!!), murabba, laungi etc. Pickling the Indian way is not my cup of tea, a whole bunch of effort, let my mom do it for me J. After all, she deserves to be praised in phone calls for her ever tasty, so perfect, spicy bytes of Achar. Isn’t it??

Aam Panna - Sip it up to sooth the thirst

–This glass is a normal panna, no soda added–

Time: 45 mins

Serves: 4-5 regular bowls

Ingredients:

  • 1 raw mango/ kacchi kairi, the green variety
  • 1 ltr. water
  • common salt according to taste
  • a pinch of black salt
  • a pinch or 2 of freshly crushed black pepper
  • 1 tsp. jeera powder
  • a pinch of red chili powder (optional)
  • 1 sprig of mint leaves/pudina, 7-8 leaves will be fine
  • 1 green chili, not too hot (after all, we are preparing a cool drink)

Preparation:

  • Clean the skin of the mango properly to remove all dirt and grim.
  • Boil the kairi (raw mango) in pressure cooker for 1 whistle  with water enough to dip the mango partially, almost half. Alternatively, microwave on high for 5 minutes. Don’t forget to prick it with fork for 2nd option.
  • Once the mango cools down, mash it in the same water.
  • Pass the mashed pulp and water through a wired sieve and make sure, everything is passed through, except the peel. Fibers are good for digestion.
  • Mix water, approx. 1/2 ltr. or according to the tanginess you like.
  • Mix salt, black salt, black pepper and jeera powder.
  • Red chili powder is optional but you can add if you wish.
  • Blend green chilies and pudina leaves in a blender or crush in mortar and pestle.
  • Add the green paste to the panna.
  • Chill the panna.
  • While serving, pour 2/3 part of panna in glasses and fizz up the panna with 1/3 part of soda.
  • Relish in the hot summers!!

 Panna - a chilled drink for the summers

Notes:

Adding pudina and chilies is completely optional.

You can actually prepare the mango syrup and store in fridge for 4 weeks. When ever required, just add water and 2-3 spoons of the syrup. Panna is ready

To make sweet panna, add sugar instead of salts and pepper.

Soda, this is one twist, I liked so much, which happened by chance. Preferably, we should have amore tangy panna if  you mix soda or else it will take away the actual flavor.


A CAKE-y cheers to the women power

 Semolina Cake - A slice of indulgence

Another women’s day is here. And I was so at unrest? There was a small celebration in Mahi’s daycare and I was looking forward for it. And then came the news that maid is not turning up (must be celebrating a grand day for herself!). Phew!! So, we are gonna late by an hour almost. Milk spilled on the kitchen counter when that treacherous scissor played a trick with the packet and me and was smiling at my vulnerability. Mahi was very cranky and was not willing to settle for anything but a day off (from my office to attend her). I started getting armed for more such mishaps welcoming me further on the “International Women’s Day”.

dense suji cake

Suji ka Cake

The celebration was quite fun filled and mixed for us. We prepared a card using some decoration items, colors and flowers. Mahi was supposed to give it to me as her token of love. But, that card came to rescue me and console her from her tantrums and tears. It’s with her now, safe in her custody. We prepared a sandwich using 2 bread slices, ketchup, boiled potato slices and cucumber. Some chaat masala was also provided to zing up the sandwich. We were (read me! mahi was busy licking chaat masala with fingers) trying to come up with a nice sandwich. By the time I designed my bread, I realized, the challenge was to feed the sandwich to the kids fully and nothing was to be displayed as a creative thing. LOL. Anyways, I was failed to feed her my so called creation while others proudly finished that. She had a heavy n late breakfast and the cucumber slices were gone slowly into her tummy Smile. Ahh, and not to forget the full glass of water, she gulped in daycare while crying her tonsils out.
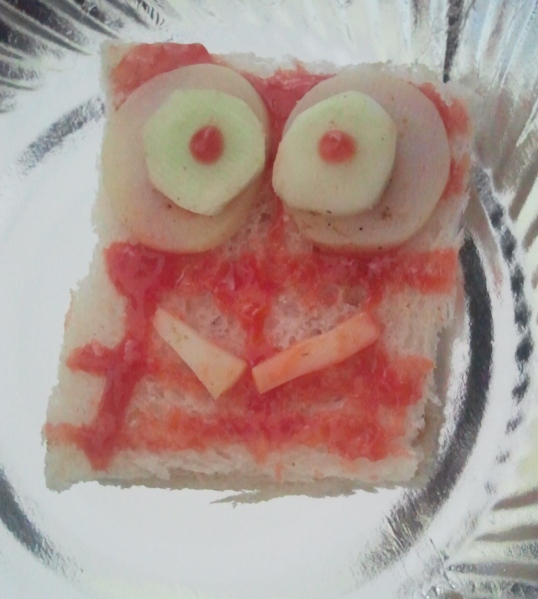
Mahi's Sandwich

-Sandwich we made-

So, this is how the day passed, almost. Another usual day in a woman’s life. Another common day for a mother.

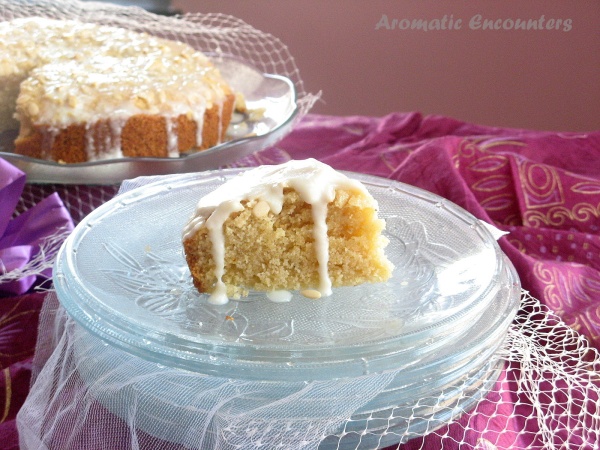
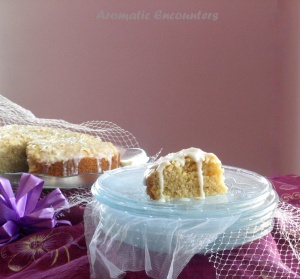
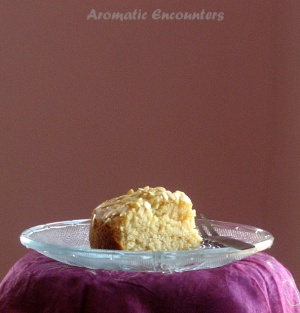
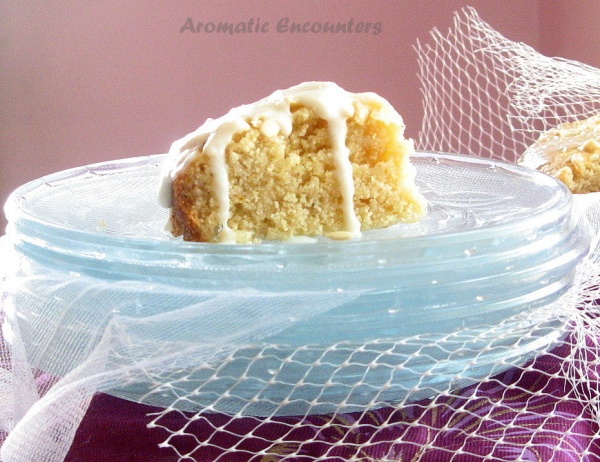
Okay, back to women’s day, I really feel proud of being owner of this blog and know, most of you also do so at yours. We do this solely for the purpose of sheer joy and satisfaction. So cheers for us!!! I feel no need of praising how women have exceled in the world, how they are epitome of love and care, what they do for the family and what they deserve. Just a virtual slice of this cake I baked y’day. And yes, now that I am trying to convince my self that caking and baking is not that tremendously gigantic thing, this cake is the most successful one in the recent past (in last 2-3 months). Before that, I just baked a chocolate cake successfully last year and heaven!! it came out pretty well. Back to this cake, this is a dense cake with thick texture and less moisture because of semolina. So here we go.

Preparation Time: 20 mins (I am a novice baker, I took much more as I messed up many things)

Baking Time: 30 mins (33 for me)

Serves: an 8 inch cake

Ingredients:

  • 1 cup Semolina/ suji
  • 1/2 cup whole wheat flour/ atta
  • 1/2 cup all purpose flour/ maida
  • 1/2 cup curd
  • 1 cup powdered sugar
  • 1/4 cup milk approx.
  • 1/2 cup oil
  • 1 tsp. baking powder
  • 1/2 tsp. baking soda
  • 1/2 tsp. green cardamom powder
  • handful of chopped cashews and pine nuts
  • 1/4 tsp. saffron

Preparation:

  • Preheat oven at 200° C. Grease the baking dish of size 8-9’’ with butter at the base and inner walls too. Dust with some maida.
  • Sift maida, atta, soda and baking powder together. Sift suji separately and mix together.
  • In a mixing bowl, combine yogurt, oil and sugar. Stir in one direction until sugar blends in.
  • Add suji mix, saffron strands, cardamom powder and milk until you get a soft dropping consistency. Beat with an electric beater for 4-5 mins.
  • Immediately pour the batter in the cake tin and sprinkle with dry nuts. Quickly push inside the oven and bake for 30 mins.
  • Before the end of baking, check with a toothpick or sharp thin knife to see if it comes out clean. I baked for 3 more minutes.
  • Relish!! the dense sinless cake.

a tiny-mini sinful experience

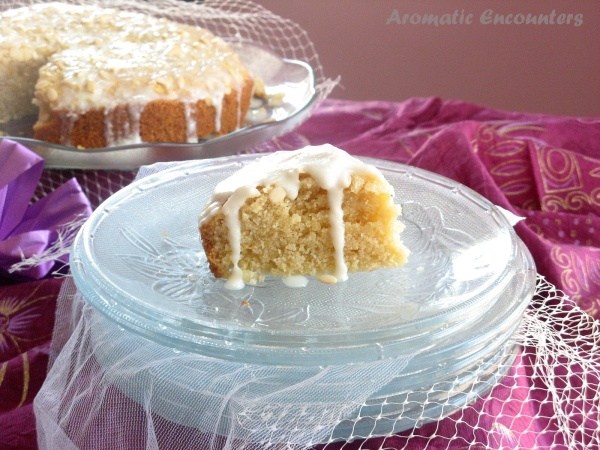
Glazing: Because I don’t like thick creams and frosting, I glazed it. I read about this glaze in a site, not sure of the link but this is a very easy one. Simple, beat the fresh cream (milk topping) and add some vanilla essence and sugar. Beat them well and liquify using a little milk. I used a tbsp. of cream, same amount powder sugar and 1/4 tsp. vanilla essence. Milk I added was not measured but should be a 1 tbsp. or lill more. you can adjust the amount as per your required consistency. BTW, the glaze got thicker with time. How?? I am not sure.

Semolina Eggless Cake

Notes:

Please do not sieve the suji with other flours/dry things. It may not pass at all from the sieve. My 1st big mistake.

Because suji is 1 notorious thing which will keep absorbing the liquids and continuing to fluff up, don’t waste a minute after you are ready with batter. I took my own sweet time for chopping nuts and then realised, the batter has very thick dropping. My next blunder. I added some more milk.

I did not dust the base and walls with flour. My cake stuck a bit at the bottom. another one.

This cake is quite thick and dense, not moist like a usual chocolate cake or others. But quite a healthy thing to go for and tastes pretty well.

My saffron didn’t impart a good yellow color, next time I am going to increase the amount.

Anyways, I am learning after all!! Smile

Rich Creamy Pearls – Paneer and Coconut Laddoo

Paneer-Coconut Laddoos

Paneer is always been favourite among Indians. And, if it comes in the form of dessert, it is something out of this world (sone pe suhaga!!). I simply love rasmalai. These paneer laddoos are simple to prepare and fabulously tasty to dig in. Because Mahi loves chocolate (which kid does not?), I simply added some cocoa powder in half of the paneer mixture and rolled out chocolate paneer laddoos. Trust me, they were a huge hit and are healthy too. I was left with few white paneer laddoos by the time, I was ready to take clicks.

These laddoos have a lesser shelf life like 3-4 days, that too, needs to be refrigerated because of paneer. But, actually, you may find the platter empty in your fridge in 2 days only 🙂

Time: 45 mins

Serves: 25 laddoos

Source: Book by Sanjeev Kapoor on Paneer

Ingredients:

  • 2 liters full cream milk
  • juice of 1.5 medium sized lemons
  • 1/2 cup powdered sugar
  • 2 pinches elaichi/cardamom powder
  • 1/2 tsp. rose essence
  • 1/3 cup desiccated coconut
  • 1/3 cup pistachios
  • 2-3 tsp. milk powder (optional-use only if require)
  • 2 tbsp. coco powder (optional)

Preparation:

  • Heat the milk in a heavy bottomed pan. Bring it to boil. After one boil, pour the lemon juice and keep stirring.
  • Once the milk splits, the hay will look pale green-yellow in color and the milk will curdle making cottage cheese/ paneer.
  • Strain the paneer through a muslin cloth and tie the cloth tightly to remove excess water. Immerse it in ice cold water to stop further cooking process.
  • Once the paneer cools down a little, spread it in a plate/ counter top (a clean one!!) and knead the paneer with the palms until the granular texture becomes a finer one. This may take 5-7 minutes.
  • Add the powdered sugar, grated coconut and elaichi powder.
  • Divide mixture in 2 equal parts. Add vanilla essence and cocoa powder in one part. Add rose essence in another part. Add milk powder if the dough is too moise to bind.
  • Divide the mixtures in equal portions and make laddoos out of them.
  • Crush pistachios in a blender coarsely.
  • Roll the laddoos in pista powder and Chill in fridge for 1 hr or until firm.
  • Serve your guests and family and enjoy the applauds (I really did).
  • Relish!!

Paneer and coconut laddoos

Notes:

A drizzle of chocolate sauce on the black laddoos would have been a cheery on the ice. Alas! I had none at that time.

Do not forget to refrigerate the laddoos.

Notes:

Tips for Paneer making and usage: (source – Sanjeer Kapoor’s book – Paneer)

Whey

  1. The whey can be used to knead chapati dough or to boil rice.
  2. Can be used to make paneer in the next batch.
  3. Produces a soft crumbly paneer.

Paneer-

  1. Firmer paneer is prepared by using lemon juice or vinegar.
  2. Keep it fresh by immersing in water to cover and refrigerate. Refresh the water every 8 hours (preferably) or 12 hrs (otherwise).
  3. For sweets, just squeeze the whey out through a muslin cloth or use a weight for just 10 mins.
  4. Sprinkle a little water over a dry paneer dish while reheating, to prevent the paneer for getting harder and rubbery.
  5. Add paneer towards the end of cooking, as far as possible.

Paneer Pearls

Onion Fry–Pyaz ki Sabjee


Onion Sabjee

Onion Fry

This post is dedicated to our centuries long known ingredients “Onions”. So humble that they mix with any thing (ofcourse, savoury) from grains to veggies to leaves…soups to salads…that they enjoy an indispensable place in our pantry. Who can ignore the piping-hot-spicy onion-pakoras relished during the monsoon or a chilly night. Many are fans of onion rings. But today, I have something different to treat with – Onion Sabjee

I learnt this subjee from my mom, she used to do this in jiffy. But it tastes quite good, so different from our usual currys and dry entrees. And, it is a simple-fast thing to do. 

And I could not resist mentioning that INDIA stands 2nd among the producers after China in the world. No wonder, why we Indians love to add onions in every other recipe.

Pyaz ki tikhi sabjee

Onion Subzee


Time: 20 mins.

Serves: 2

Ingredients:

  • 2 medium sized onions
  • 2 green chilies, chopped finely
  • 1/2 tsp. ginger-garlic paste, I prefer freshly crushed in mortar-pestle
  • 1/2 tsp. each of cumin seeds/ jeera+ small mustard seeds/ rai +Saunf/ fennel seeds
  • 1/2 tsp. coriander powder, 1/2 tsp. dry mango/ amchoor powder, 1/2 tsp. turmeric powder
  • 3 tsp. oil
  • Salt per taste
  • Coriander leaves to garnish

Preparation:

  1. Slice onions in thin strips.
  2. Heat oil in a nonstick pan. Splutter seeds.
  3. Add chilies and ginger garlic paste.
  4. Fry them until the paste turns light brown.
  5. Add onion slices and the powdered spices. Add salt too at this stage so that onions do not turn too crispy. A little sliminess is good.
  6. Mix well and cook for 7–8 minutes, uncovered. Keep stirring in between.
  7. Garnish with chopped coriander leaves and serve as a side dish.
  8. Relish!!


Notes:

Adding the greens of spring onions is also a good idea towards the end of cooking. This will give added freshness.

You can add lime juice for a tangy kick instead of amchoor.


Onion sabjee